The short answer: I build better Sales Navigator lists by starting with a tight ICP, using a small set of filters, and splitting leads into focused list segments. A 200-contact list that fits my ICP often beats a loose 2,000-contact list on acceptance rates, reply rates, and bad-fit accounts.
If I want cleaner outreach, I keep the process simple:
- Write the ICP first
- Map ICP traits to Sales Navigator filters
- Choose account-first or lead-first search
- Use title clusters and Boolean search
- Add timing signals like recent posts or job changes
- Save leads into small, clear list segments
- Review alerts each week and archive stale lists after 90 days
A few numbers matter here. Sales Navigator caps a single search at 2,500 results, lead lists at 1,000 leads, and total saved leads at 10,000. That means I need tight filters and clean naming from the start.
This guide shows how I turn Sales Navigator from a big people database into a daily list-building system I can use for comments, DMs, and follow-up.
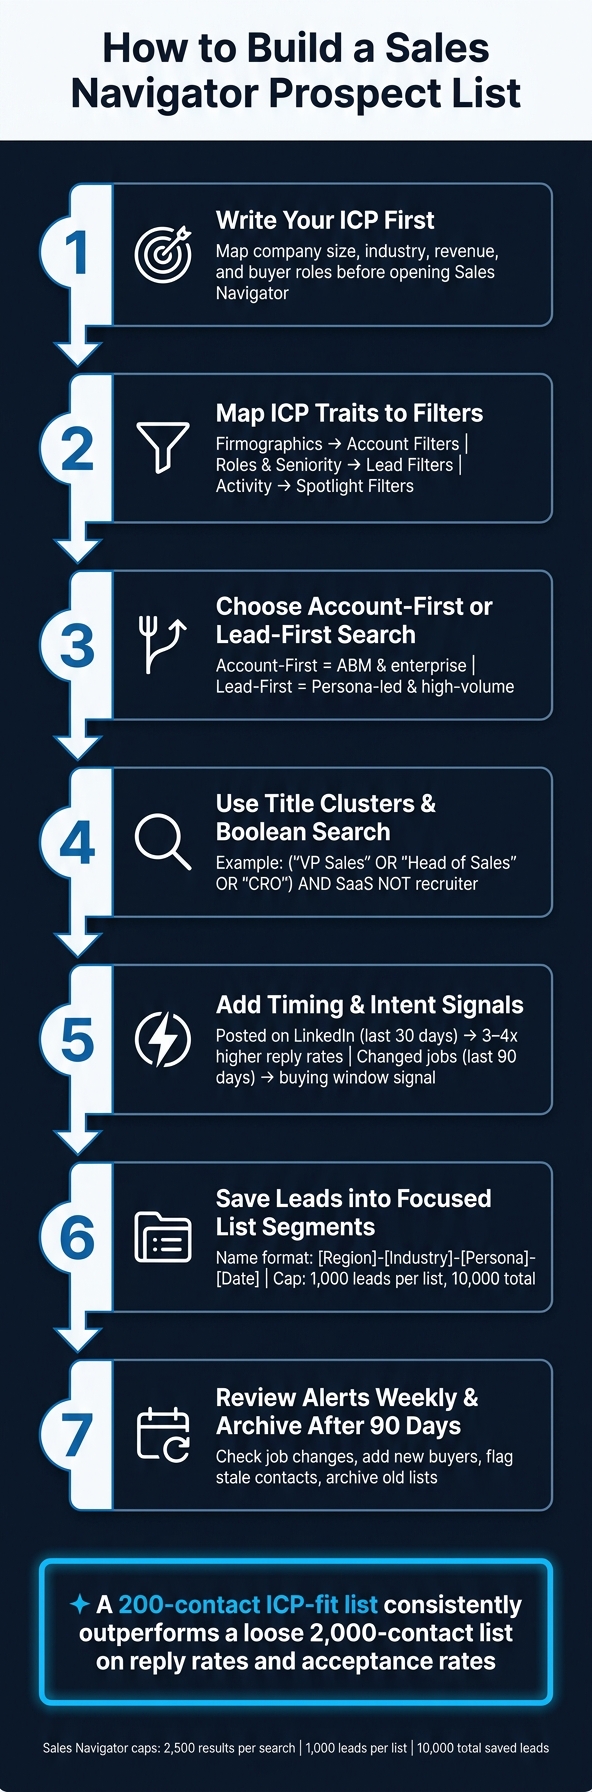
How to Build a Sales Navigator Prospect List: 7-Step Process
How To Make LinkedIn Lead Lists That Actually Work in Sales Navigator
Define your ICP before you open Sales Navigator
Define your ICP before you open Sales Navigator. Every filter should come from that profile, not from guesswork. The goal is simple: map your ICP to the Sales Navigator fields you'll use, so when it's time to build a search, you already know what goes where.
Pick the company filters you will use
Start with the firmographic layer. Set your company headcount first, such as 11–50 for SMB or 201–500 for mid-market. Then choose industry, and keep it tight to your top 3–5 highest-converting categories. After that, set geography. It usually makes sense to begin with a broad region and narrow it later.
If revenue or funding stage affects deal size, add Annual Revenue or Funding Round. And if your product depends on a company's stack, use the Technologies Used account filter to find companies already using tools like Salesforce or HubSpot.
Headcount Growth can help too. Set it to 10%+ to find companies that are actively scaling.
Define buyer roles and the buying committee
Use title clusters, not single-title searches. A search like "VP Sales" OR "Head of Sales" OR "CRO" can pull in the same kind of buyer across very different org charts. Titles shift from company to company, so this gives you better coverage.
Tie seniority to deal size. In SMB and mid-market, Managers and Directors are often the right starting point. In enterprise sales, Directors and VPs tend to make more sense.
Don't stop at one contact. Try to find 3–5 contacts per target account. That usually means a mix of:
- an economic buyer
- a technical evaluator
- an internal champion or end user
Match your ICP to Sales Navigator filters and keywords
Some ICP traits fit neatly into built-in filters. Others don't. That's where Boolean search in the Job Title or Keyword fields comes in handy. It helps you catch niche roles that LinkedIn doesn't always group well, like "RevOps Lead" or "Growth Founder".
Use this table as a quick reference before building your first search:
| ICP Element | Filter Category | Filter Name |
|---|---|---|
| Company size | Account Filter | Company Headcount |
| Industry | Account Filter | Industry |
| Revenue / funding | Account Filter | Annual Revenue / Funding Round |
| Company growth | Account Filter | Headcount Growth |
| Department | Lead Filter | Function |
| Seniority | Lead Filter | Seniority Level |
| Specific role | Lead Filter | Job Title (Boolean) |
| Active on LinkedIn | Spotlight Filter | Posted on LinkedIn in last 30 days |
| New to role | Spotlight Filter | Changed jobs in last 90 days |
With this map, you can build searches that line up with your ICP field by field.
Set up Sales Navigator for list building
Once your ICP maps cleanly to filters, the next step is setting up Sales Navigator so each search is easy to run again.
Choose account-first or lead-first search
Sales Navigator gives you two search paths: account-first and lead-first.
Account-first is the better fit for ABM-style targeting or enterprise sales. You begin with target accounts, then identify the buying committee inside each company.
Lead-first works better for persona-led campaigns or higher-volume outreach. You search across LinkedIn for people with the right job titles and seniority levels.
| Workflow | Best Use Case | Strengths |
|---|---|---|
| Account-First | ABM & enterprise sales | Maps full buying committees; uses company growth and funding signals; slower, adds a second step |
| Lead-First | Persona-led / higher-volume outreach | Faster execution; finds specific roles across LinkedIn |
Pick one path for the campaign, then build the search around that choice.
Set sales preferences and search defaults
Set Sales Preferences first. Add your default territory, industries, headcount range, functions, and seniority. These defaults also shape lead recommendations.
Start narrow. If the result set feels too thin, open up one filter at a time. That makes it much easier to see what's changing instead of turning the whole search into a free-for-all.
With those defaults in place, name your lists before saving your first lead.
Name your lists before you start saving leads
This sounds minor, but it saves a lot of cleanup later. If you skip it, your lists can get messy fast.
A simple format like [Region]-[Industry]-[Persona]-[Date] keeps everything easy to scan and sort.
For example:
US-SaaS-VP Sales-Q3 2026.
Each lead list is capped at 1,000 leads, and you can save up to 10,000 leads total across all lists. Clean naming from day one helps you avoid duplicate leads and overlap across campaigns.
sbb-itb-f8f3793
Build targeted prospect searches
With your lists named and your search path set, now you can build the search itself. The aim is simple: move from a huge pool of LinkedIn members to a tighter group that matches your ICP.
Use core lead and account filters to match your ICP
Start by using your saved list setup to break the search into segments before you apply filters. On the account side, begin with industry, company headcount, and headquarters location. On the lead side, add job title, seniority level, function, years in role, and geography. It’s usually best to start broad and narrow from there.
Relationship filters can also help you find people with a warmer path in. TeamLink connections, shared experiences, and past colleagues are useful here. Even if you’re working from a cold list, second-degree connections often give outreach a better shot.
Add intent and timing signals to find active prospects
Fit matters first. Then timing comes into play. After you’ve set your main filters, use Spotlight filters to spot people who are more likely to reply and more likely to be in a buying window.
Two signals matter most here. First, "Posted on LinkedIn in the past 30 days". Active posters reply 3x to 4x more often than dormant profiles. Second, "Changed jobs in the past 90 days" and "Years in Current Role: 0–1" can help you find new executives who may be ready to buy.
On the account side, the Headcount Growth filter set to 10%+ points to companies that are growing fast and may need new solutions.
Use Boolean search and split large result sets into smaller lists
If your results are still too broad, tighten the search with Boolean logic. Sales Navigator supports Boolean operators in the Job Title and Keywords fields. AND, OR, NOT, and parentheses help you include title variations while cutting out roles you don’t want.
Here’s a practical example for B2B sales leaders:
("VP Sales" OR "Head of Sales" OR "Chief Revenue Officer") AND (SaaS OR "B2B software") NOT recruiter
That cuts noise without making the search too narrow.
One limit is worth knowing: Sales Navigator caps any single search at 2,500 results across 100 pages. If you go over that, split the search into smaller lists by region, seniority tier, company size band, or industry sub-sector.
Save, segment, and maintain your prospect lists
Save leads and accounts into campaign-ready lists
After you filter your search, save only the contacts that fit the campaign you plan to run. Before you save a full batch, spot-check 20–30 profiles. Look at each one and ask a simple question: Would I send this person a personalized DM? If the answer is no several times in a row, tighten your filters before you save more.
Keep lead lists and account lists separate. Lead lists track people. Account lists track companies.
It also helps to name lists clearly from day one. A label like "US-SaaS-Head of RevOps-New Job 90d" tells you what's inside the list and why it exists. No guesswork later.
Segment lists by persona, industry, or campaign goal
Once your list is clean, split it by outreach motion so each group gets a more pointed message. The best way to segment depends on how your sales team works. This side-by-side view makes it easier to pick the right path:
| Segmentation Method | Best Use Case | Strengths | Risks |
|---|---|---|---|
| Persona/Role | Standard outbound targeting decision-makers | High relevance in messaging; easy to map to specific pain points | Titles are inconsistent across companies; may miss non-obvious influencers |
| Industry/Vertical | Campaigns requiring specific case studies or social proof | Allows for industry-specific language and tailored value props | Can be too broad if the industry is large (e.g., "Software") |
| Intent/Spotlight | High-priority sprints for active buyers | Captures prospects in a buying window (new job, recent funding) | Small list volume; requires rapid execution before the signal goes stale |
| Account-Based (ABM) | Expansion into existing accounts or high-value targets | Deep penetration of the buying committee; builds multi-threaded relationships | High manual effort per account; slower to scale than persona-based lists |
| Geography | Regional events or territory-based sales motions | Aligns with local time zones and buying behaviors | Over-segmenting by location can create many tiny, unmanageable lists |
In plain English, different segments need different messages. A Head of RevOps at a SaaS company probably cares about different problems than a founder at a logistics firm. If you lump them together, your outreach starts to feel generic fast.
Refresh lists with alerts and remove stale contacts
After segmentation, keep each list current so you're not working from old profiles. People switch jobs, get promoted, or drift out of your ICP. Lead and account alerts help by surfacing job changes, company news, and recent posts without forcing you to run the same searches again and again. That keeps your lists usable for the next outreach cycle.
A simple weekly routine works well:
- Check alerts
- Add new buyers who fit
- Flag anyone whose new role no longer matches your ICP
- Archive old lists after 90 days to keep your workspace clean
This takes a little discipline, but it saves you from one of the most common outbound mistakes: reaching out to the right person six months too late.
Turn prospect lists into a repeatable LinkedIn pipeline
Now that your lists are saved and segmented, the next step is simple: turn them into a daily workflow.
Rank leads by fit, role, and recent activity
A saved list only helps if you work it in the right order. Treat it like a daily work queue, not a random scroll.
Start with ICP fit. Then look at role authority. After that, check recent activity. People who post often and people who recently changed jobs tend to reply faster.
If you’ve only got 15 minutes a day, start there. That order helps you decide who should get your comments, DMs, and follow-up first.
Use saved lists to guide comments, DMs, and follow-up
The easiest way to stay consistent is to work one list segment per day.
Here’s a simple flow:
- Check recent posts
- Leave 1–2 specific comments
- Send 3–5 short DMs to the most active leads
Lead with one clear reason for reaching out. Ask one qualifying question. Keep the message short. InMails under 400 characters get 22% more replies than longer messages.
As you go, mark each contact as contacted or replied. That stops duplicate outreach and shows you exactly where each person stands in your pipeline.
If you want to make that workflow repeatable, move the same list into your execution layer.
Put Sales Navigator lists to work with Postelix
Postelix sits on top of your Sales Navigator lists and handles the execution layer. It spots which saved leads are showing real buying intent, drafts LinkedIn DMs and replies in your own voice, and points out strong comment chances. You approve every draft before it sends.
| Layer | Sales Navigator | Postelix |
|---|---|---|
| Lead discovery | Uses filters to find ICP matches | Identifies which leads show real buying intent |
| Messaging | Provides InMail credits | Drafts DMs and replies in your voice |
| Engagement signals | Surfaces "Posted on LinkedIn" activity | Surfaces specific strong comment opportunities |
| Workflow | Static list management | Human-in-the-loop repeatable system |
Sales Navigator builds the list. Postelix helps you act on it every day, with a human approving each step.
FAQs
How narrow should my ICP be?
Your Ideal Customer Profile should be tight enough that you can write one accurate, personal message for everyone on a list.
If it’s too broad, like just “VP Sales,” you can end up with 800 people who don’t have much in common. And when that happens, your outreach starts to feel generic fast.
Here’s a simple test: manually check 20 to 30 profiles. Then ask yourself, would I send this person a personalized note? If your answer is only “sometimes,” your criteria are still too broad.
When should I use account-first vs. lead-first search?
Use lead-first search when your goal is to find individual buyers based on details like job title, function, or seniority. It’s the better fit for direct outreach across many different companies.
Use account-first search when you want to go after specific companies based on signals like headcount growth, funding events, or industry. From there, filter inside those accounts to find the right decision-makers for your outreach list.
How often should I refresh my Sales Navigator lists?
Static lists tend to go stale fast, often within 60 to 90 days. So instead of updating them by hand over and over, use Sales Navigator’s saved search feature to keep bringing in new prospects that fit your criteria.
LinkedIn also sends automated weekly digest alerts for saved searches. That gives you a steady rhythm for checking new matches without having to babysit the process.
Postelix can support this workflow by surfacing high-value opportunities and helping keep your pipeline active.